The Problem / Introduction
I’ve been working on Void Sols which is a minimalist, top-down, souls-like. The dark aesthetic is heavily utilized in gameplay, which meant I needed fine-tune control over what the player could and could not see. Notably, I had hand-placed torches in the environment that the player could light. These torches served as breadcrumbs to help keep track of areas they have previously explored, to help the player build a mental model of the maze-like world, and most importantly, they illuminated an otherwise oppressively dark environment.

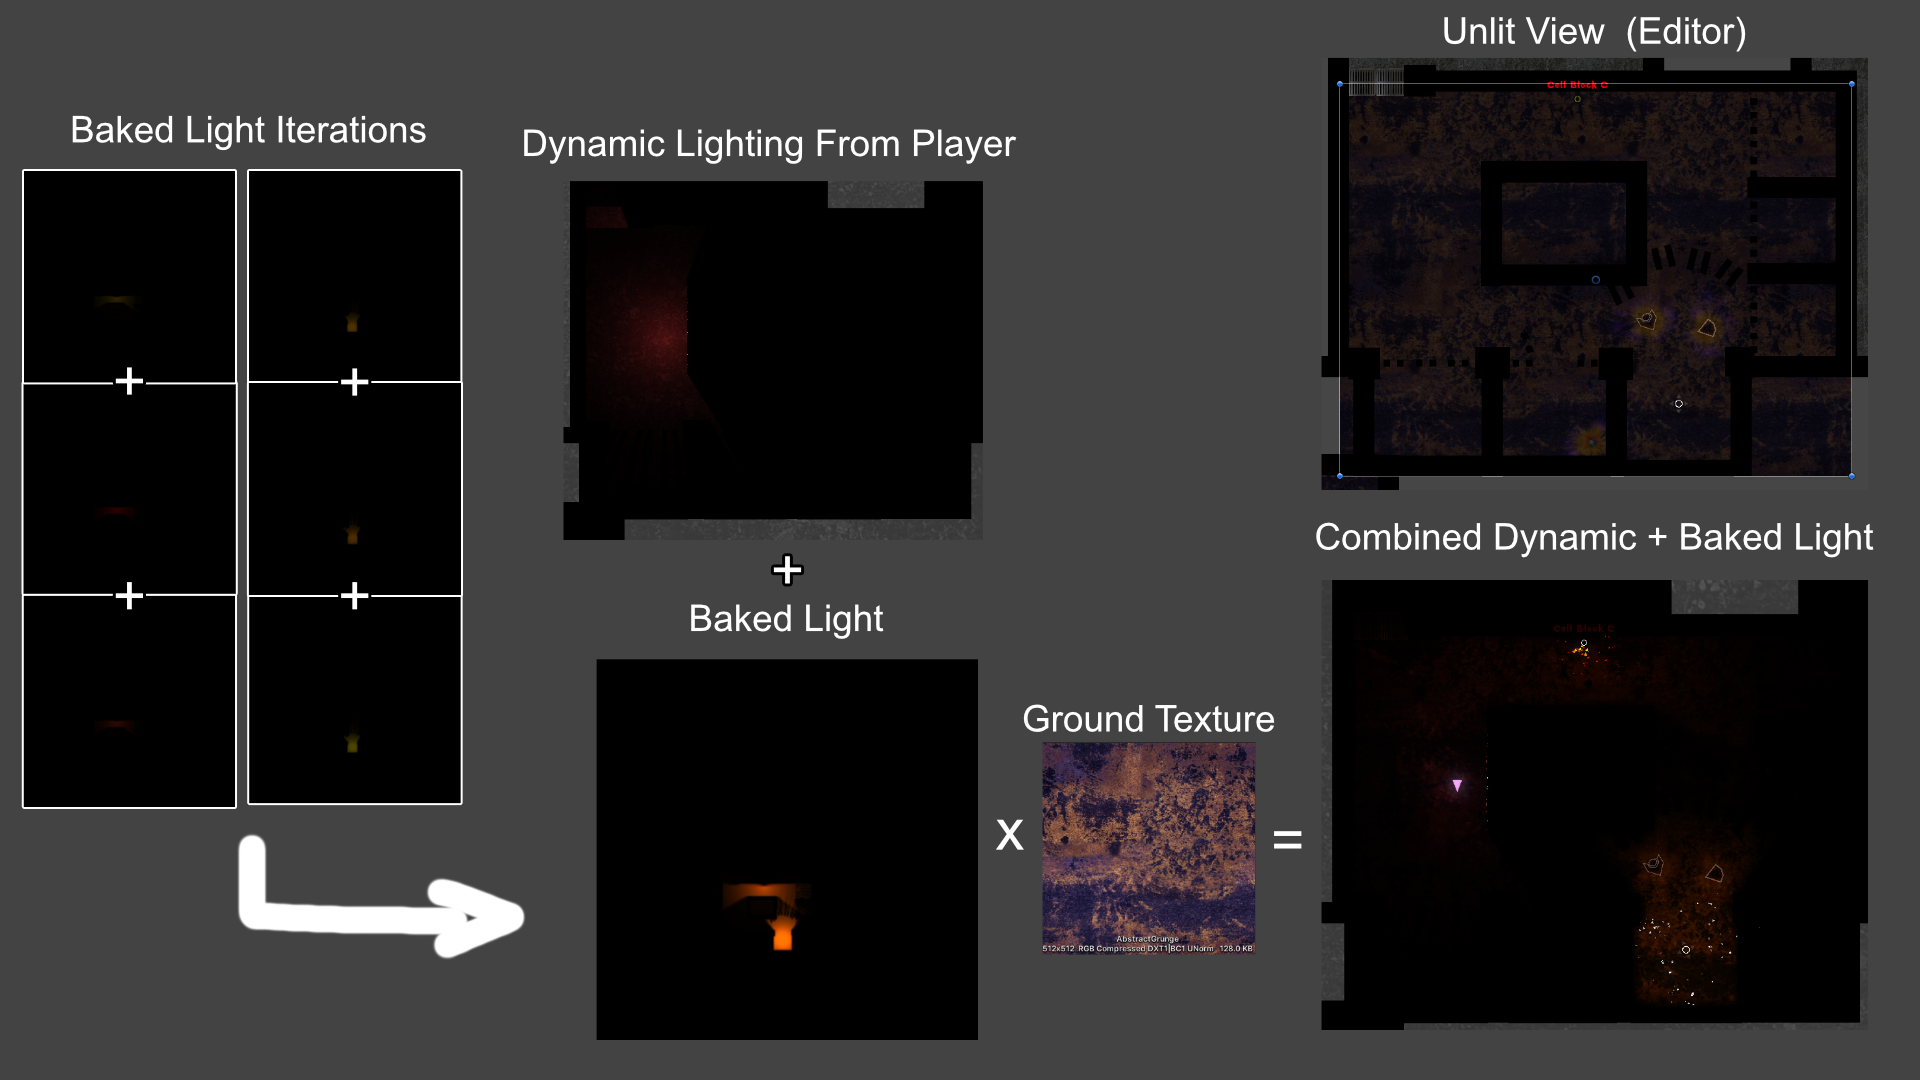
In the final result, you can see that the lighting from the torch above (the yellow ring towards the top right corner of the image) and the light source from below cast soft shadows that blend nicely with the environment. The player light source casts runtime dynamic hard shadows and the lighting from both sources blend to help illuminate the environment as intended.
The player already contained a dynamic shadow-casting light source, and every enemy the player encountered would also have a non-shadow casting light source. Within certain areas, the player could see the light being cast from many torches at a given time. In my initial tests, this caused performance and graphical issues. The lighting would either be too bright or too dark or would start glitching out as soon as too many enemies’ light sources were enabled.
So this brought me to start searching for a solution: how do I create lighting for torches that has a low runtime cost?
Tech Background and Disclaimer
This was all done for a project using Unity 2021.3.1f1, and using the Universal Render Pipeline. It also uses the Unity 2D Lighting package which (at the time that I did this work) had very recently been released out of its “Preview” state. Some of the specifics have probably changed since, so I try to focus on my problem-solving process and the methodologies that helped me solve my problems.
Light Baking Basics
I had messed around with 3D light baking on some prototypes, so I was roughly familiar with how it worked. In case you’re not familiar, here are the basics of what light baking does. (The exact process will differ depending on the engine and the approach; this is just a rough idea that I needed to understand to accomplish my goals).
- The engine uses static light sources to simulate rays of light hitting objects in the environment
- This simulation can be run many many times to simulate how real light sources bounce off walls and spread out
- After combining the simulation data, the light information is “baked” to a texture
- The baked lighting texture uses distinct UV maps on objects that ensures every face has its own space on the map and that they are scaled relatively appropriately. This avoids texture issues that may arise from reusing UV maps being used for color or normal textures, and ensures that seams in geometry are evenly lit
Unity has many light baking capabilities that helps create realistic ambient occlusion and global illumination effects. Since Void Sols is a top-down game, I knew I didn’t need to worry about GI, and could focus solely on figuring out how to get the 2D light sources to bake onto the ground textures.
The Baking Camera
The metaphor I used to help my conceptualize this task was the idea of “painting light”. I even ended up naming the script that does most of the work PaintedLightBG.cs when I started prototyping and haven’t renamed it since. The first thing I needed was some way to take the static light sources the player has lit and “paint” their light onto a temporary texture. The easiest method that came to mind was to use a literal camera to “take that picture”.
So I created a new orthographic camera and positioned it at the center of my current level such that the camera could see the entirety of the level. I immediately ran into a limitation: anywhere beyond the bounds of this camera would not bake lighting. My solution: I’ll ignore that problem and cross that bridge when I get there. Moving on, I set the culling mask to only render the layers that should be affected by static light sources. Another limitation: enemies won’t cast shadows on baked lighting backgrounds. Early tests showed that this was not a major issue so once again, I moved on.

I set the torches to be off by default and ensured they are all on the same layer. This layer is ignored by the default camera that renders the game, and is only seen by the “Baking Camera” as seen in the image below.

The static walls layer contains parts of the level geometry that I know won’t move. The “Baking Camera Only” layer contains only the background layer that the light is baked onto.

Now I created a large, plain, white sprite to fit the entire view of the baking camera. This sprite uses the default “Lit Sprite” material, and will serve as my “canvas” onto which the light will be painted.
After setting things up in Unity, I could start coding the system that will actually save this painted data to a texture. This uses render textures, and I decided to create them at runtime so I could reliably set them up only when I needed them. I also realized I would need two render textures since one would be the direct target of the camera, and the other would be the persistent texture that is continually being painted on.
    public Camera cam;
    [SerializeField, ReadOnly] private RenderTexture rt, result;

    private void Awake()
    {
        rt = new RenderTexture(512, 512, 0, RenderTextureFormat.ARGBFloat)
        {
            filterMode = FilterMode.Bilinear,
            antiAliasing = 4
        };
        rt.Create();
        result = new RenderTexture(rt.width, rt.height, rt.depth, RenderTextureFormat.DefaultHDR);
        result.Create();
        cam.targetTexture = rt;
    }
All this block of code does is initalize two identical render textures (the only difference being their format, which I found through trial & error with the shader I’ll get into later). It then assigns our “Baking Camera” to render onto one of the render textures. Now that the camera is setup, I can start “taking pictures”.
    private IEnumerator LightAnim()
    {
        while (lightBakingQueue.Count > 0)
        {
            //I created a queue of lights that needed to be baked by sorting lights by distance
            // to the player. That way lights closer to the player get baked faster
            currentLight = lightBakingQueue.Dequeue();
            currentLight.ToggleLight(true);
            //I had to delay the next section because sometimes the light baking would fail
            // my theory is that it takes a frame for Unity's lighting system to start working?
            yield return null;
            int iterations = 0;
            while (iterations < maxIterations)
            {
                iterations++;
                //These iterations are what create the soft shadows. By randomizing the light position every iteration,
                // we are simulating a light source that is larger than a singular point of light. I started with 10
                // iterations per light before realizing that 3 was more than enough to create soft shadows
                currentLight.RandomizeLightPos();
                cam.Render();
                // I'll get into the shader being used here later
                Graphics.Blit(rt, result, blitMat);
                yield return null;
            }
            currentLight.ToggleLight(false);
            currentLight = null;
        }
    }
To accomplish runtime baking that didn’t cause massive lag, I run the baking system in the coroutine shown above. This ensures that each light takes maxIterations frames to bake. In a scene with 10+ lights and 3 iterations per light, it can take over 30 frames to bake the whole scene. Therefore, I placed all the lights in a queue based on distance to the player. That way lights closest to the player will bake sooner, minimizing the player experiencing any weird visuals.
Let’s look at what the camera bakes now…
| Iteration 1 | Iteration 2 | Iteration 3 |
|---|---|---|
 |
 |
 |
and 3 more iterations from another light source
| Iteration 1 | Iteration 2 | Iteration 3 |
|---|---|---|
 |
 |
 |
You can’t really tell the light position is being randomized that much, but it doesn’t need to move too much to create soft shadows. The color changes also help to create a more realistic “soft fire light source” effect. Now that we have our camera taking pictures, we need to write a shader that composites these textures together, and bakes them into the background game texture!
Shaders and Materials: Putting it all together
Before I started trying to bake the lighting onto level geometry, I needed to be able to combine these individual pictures the camera was taking. To do this, I used Graphics.Blit(RenderTexture, RenderTexture, Material) to apply one texture onto another using the provided material. That material wasn’t anything fancy, and primarily needed to be additive and also blur the result slightly.
Tags { "RenderType"="Transparent" }
Blend One One

...

fixed4 frag(v2f i) : SV_Target
{
    fixed blur = 0.001;
    fixed4 col1 = tex2D(_MainTex, i.uv + fixed2(blur, blur));
    fixed4 col2 = tex2D(_MainTex, i.uv + fixed2(-blur, blur));
    fixed4 col3 = tex2D(_MainTex, i.uv + fixed2(-blur, -blur));
    fixed4 col4 = tex2D(_MainTex, i.uv + fixed2(blur, -blur));
    fixed4 col = (col1 + col2 + col3 + col4) / 5;
    col.a = (col.r + col.g + col.b) / 3;
    return col;
}
These two bits of code are the only things I changed from the boilerplate Unity unlit shader. I created a material from this shader, and used it in the Graphics.Blit call in the code block from the previous section to combine the images. Here are 3 more images taken by the Baking Camera:
By combining the two light sources from the six iterations from before, we get the following composite texture:

As you can see, it adds the lighting from each iteration together, and also applies a subtle blur that amplifies the “soft lighting” effect. Inadvertently, the blur also simulates a little bit of ambient occlusion! A happy little accident.
Ok, so now we have this texture. How do we apply it to the ground textures and ensure that the player light source still works too? This is where we crack open the Shader Graph. We start with how to sample this texture we’ve created. Since this texture is essentially a picture taken by a camera in world space, we need to use world space coordinates to sample the texture.

We have to divide the world position by 100 because the Baking Camera has an orthographic size of 50. We also add 0.5 to the X and Y coordinates because the Baking Camera to make sure the texture is centered properly
I also added an extra property to offset the UVs further, because I knew that eventually I would want to move the Baking Camera around as the player explored the open world. We use the result from all this math to sample the composite texture we created before.

After sampling the texture, I also multiply the color by a “Global Tint” which allows me to fade the entire baked lighting to black for scene transitions.
Thus far we have only handled sampling the composite baked light texture, but now we need to add the dynamic lighting coming from the player and the enemies. After a little research, I realized that Unity’s Shader Graph provides access to the 2D Light Texture node that outputs a texture which can be sampled using the Screen Position node. I multiply the result by the Vertex Color to ensure that the sprite tint color comes through. Finally, we Add it to the composite texture we sampled earlier.

I’ve gone back and forth on whether to multiply the vertex color here, or after sampling the sprite texture. I landed on this because I think it makes the lighting look more accurate, but I may change my mind again in the future. Trust the process.
Finally, we sample the actual texture of the sprite itself, and Multiply it by the combined dynamic and baked lighting. Multiplying the combined dynamic and baked lighting makes the shadows darken the sprite texture, and the lights illuminate the appropriate parts while tinting them based on the light colors. Earlier I mentioned the format of the render textures being important: this is why. The “Result” texture that is used here is set to “HDR”, which ensures that color values with a magnitude greater than 1 are allowed. This is what allows the texture here to properly illuminate the world realistically.

I also assign the normal texture node here, with control over the intensity using theNormal Strengthnode. The normal texture is technically ignored by the baked lighting, but that is ok because surface imperfections would anyways be mostly ignored by soft lighting.
… and that’s it! Here’s a birds-eye view of the final shader graph:

as well as a graphic to help explain the overall thought process behind the shader:
Closing Thoughts
I knew I had my work cut out for me when I started trying to make a game that heavily utilized darkness as a game mechanic. Many games have tried this before, with mixed results. Taking something visual and making it into a game mechanic, especially something that is also as technically complex as lighting and shadows, was a massive risk. I had to immediately adapt many other aspects of the game to react to technical limitations of what I was able to accomplish with the light baking. In the end, I found those limitations actually created some of the more interesting level design in this game.
I know for a fact this could have been made a lot more efficient. With the exception of a few small edge cases, there’s no reason this NEEDS to be done at runtime. I could bake a smaller texture per light source that saves what it will look like if it is turned on, and then add those “pre-baked” textures to the composite baked lighting at runtime. That way the performance hit of enabling lights could be mitigated further. Right now I am not really being challenged by it so I’ll cross that bridge if I find it.
Lastly, I never really covered how this system interacts with the open-world design we have ended up going with Void Sols. The short version is that as you cross certain boundaries, we have designed narrow and dark corridors that serve as transition points as the player leaves one area behind and enters a new one. This ended up being necessary for loading new zones of content anyway and also enabled us to fade out the old baked texture and slowly fade in the baked lighting of the new zone the player has entered.
I hope this was an interesting read. Please let me know if you found my approach hacky, brilliant, or “you dummy there’s an asset that does all this for you!”. Whatever it is, I like talking to other devs. Usually. Hit me up on twitter or mastodon.